post

How to Unclog a Toilet

>
Unclogging a toilet

As the old saying goes – there’s more than one way to unclog a toilet. OK, we just made that up but we’re here to prove it’s true. Sure, we love our plunger, but what if you don’t have one? Have you tried soap or baking soda?

Follow our detailed instructions for how to unclog a toilet with a plunger but stick around for plunger-less toilet clog hacks too. One way or another, we’ll get your toilet unclogged and return things to business as usual.

How to Plunge a Toilet

Flange plunger

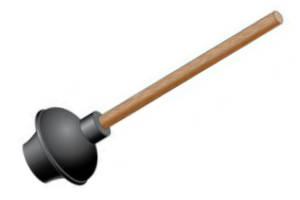
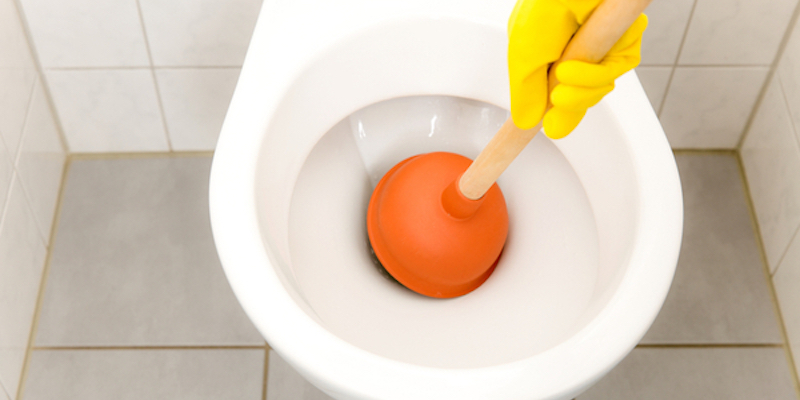
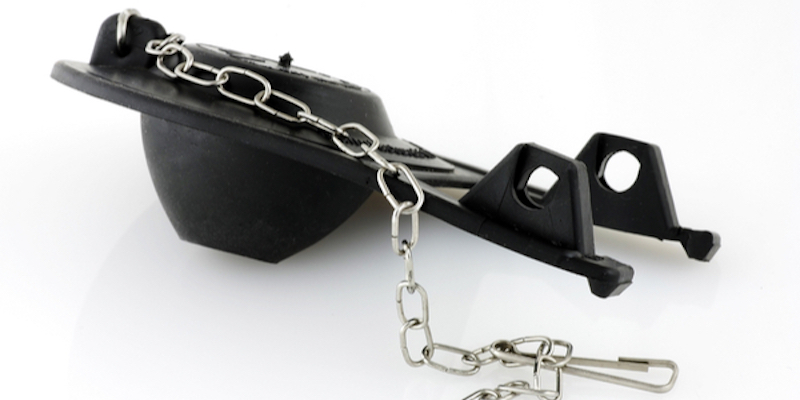
The best way to unclog a toilet is to learn to use a flange plunger properly. Flange plungers are made specifically for plunging toilets. The “flange” is an extended, sleeve-like rubber flap built into the underside of the plunger’s rubber cup. Insert this flange directly into the toilet bowl’s drain hole to ensure a tighter seal than a conventional cup plunger.

1. Prepare the area around the toilet

Plunging can get messy. Put on rubber gloves and lay out towels or plastic wrap to catch spills.

2. Level out the amount of water in the bowl

To maximize plunging effectiveness, you’ll want to fill the toilet bowl about halfway full with water (enough so that you can fully submerge the plunger cup).

3. Place the flange into the toilet drain

Maneuver the flange until it fits snugly into the top of the toilet bowl’s drain. Insert the flange at an angle so the flap fills with water as you lower it.

4. Fit the cup over the drain

Fit the cup of the plunger snugly over the drain while keeping the flange inserted. As you create the seal, let water from the bowl under the cup. The water between the cup and the drain will help generate suction pressure to unclog.

5Position and “test” your plunger seal

When you’ve created a seal with both the flange and cup, “test” it before getting started. Depress the plunger straight down and then tug it back up the way you would to unclog normally, but do so slowly. Make sure the seal stays in place throughout the process.

5a. (Optional) Apply petroleum jelly around the cup of the plunger

If you’re having trouble maintaining a seal, try applying petroleum jelly to the cup. Petroleum jelly will help keep the cup from sliding off of the bottom of the bowl.

6. Plunge forcefully 5 to 6 times

Push down on the plunger forcefully to drive the cup down and drive the flange into the drain, then pull the cup back up to “reset.” Repeat this motion repeatedly and steadily, but not too forcefully or rapidly, for 20 seconds.

7. Check water level in toilet bowl

After plunging for thirty seconds, quickly break the seal and remove the plunger. Listen for a gurgling sound from the drain (a good sign) and check the water level in the toilet bowl. If nearly all the water drained from the bowl, then you’ve probably cleared the clog.

7a. (Optional) Repeat plunging as necessary

If the water in the toilet bowl didn’t drain, repeat the plunging process a few more times. Add or bail water as necessary until your bowl is half full before you start again.

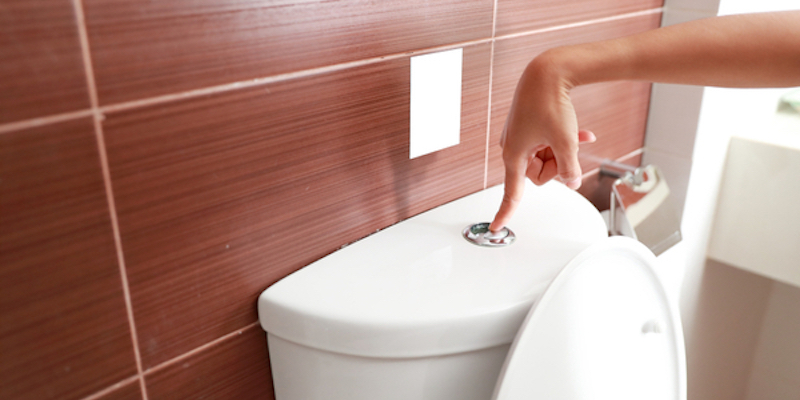
8. Test to see if the clog is gone

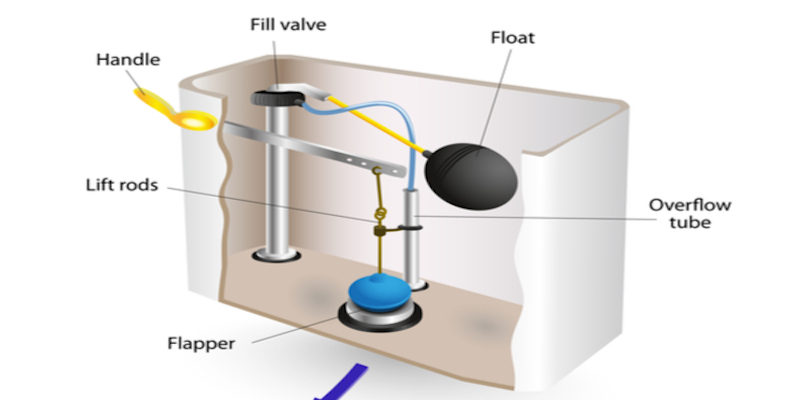
Before you test your flush, remove the tank lid. Depress the handle as usual and watch the toilet bowl closely. If you haven’t cleared the clog, then the toilet won’t flush, and the bowl will start filling with water. Prevent an overflow by manually closing the toilet’s flapper.

We recommend you only re-try your plunging up to five times. Plunging for too long could damage your toilet, and some clogs are too stubborn for even the most effective plumbing.

How to Unclog a Toilet Without a Plunger

Worst case scenario: you only have one toilet in your home, it’s clogged, you’re without a plunger and you have a dinner party starting in two hours. Stay cool. We’ve got a few more of Mike’s diamonds to get that toilet flushing again.

How to Unclog a Toilet with Dish Soap

Dish soap has natural properties that break down grease and grime in solids. It can also serve as a lubricant to get things moving.

Simply squirt a generous cup or so of your favorite soap into your toilet’s drain. Follow the soap up with a bucket of hot (not boiling) water. Water that is too hot may crack the porcelain. Wait 30 minutes and check. Repeat if necessary.

How to Unclog a Toilet with Baking Soda

Sprinkle a cup of baking soda around your toilet’s drain. Slowly add two cups of white vinegar. Allow the chemical reaction an hour to reach the clog and work its magic. You could follow up with a bucket of hot water as mentioned above. Repeat the process if necessary.

How to Unclog a Toilet with Poop in It

A bottle of coke.

Yep, we said it, but that’s the way it goes. Sometimes after your uncle has spent the better part of the morning in your bathroom, you have a very unpleasant clog.

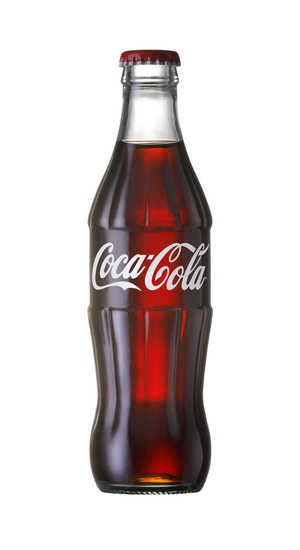
The secret here is Coca Cola. Not for your uncle, for your toilet. Turns out, coke has some awesome acids that double as unclogging agents. The carbonation also helps by putting pressure on the clog.

Pour a can or half liter bottle of coke into your toilet and then quickly cover the bowl with plastic wrap. This will help keep the pressure in. After the hour, enough dissolving should have taken place to allow a normal flush.

Unclogging LA’s Toilets the Right Way

If you’re dealing with a stubborn clog that won’t budge, then call Mike Diamond. Our expert plumbers have yet to meet a clog they couldn’t clear. 

The post How to Unclog a Toilet appeared first on Mike Diamond Services.

Did you miss our previous article…
https://tkoplumbingco.com/?p=426

post

How Air Conditioning Works

>
An air conditioning unit outside the home.

Before 1902, humans adopted creative ways of staying cool during hot summers. The ancient Egyptians hung wet reed mats in their windows that created a cooling effect when the wind blew through. Ancient Romans went so far as to pump cold water from aqueducts through the walls of elite homes.

These days you need only turn your thermostat dial for sweet heat relief in your home. But what exactly happens when you turn that magic dial? And how do you fix your AC when it doesn’t click on? Mike Diamond is the fresh smelling man with the answers to all things cool. We’ll cover the parts of a home ac system and explain how the air conditioning system in your house works. If your AC isn’t working, we’ll troubleshoot the common reasons why.

Who invented Air Conditioning (and the summer blockbuster)?

The man credited with inventing air conditioning as we know it is Willis Carrier. At the turn of the 20th century, he had an epiphany while standing on a train platform. He realized that humidity could be removed from air causing it to feel colder. Willis built a system of ice chilled coils that kept mills and printing companies cool during hot industrial workdays.

A dark movie theater interior.

Stuart Cramer invented a ventilation device around the same time that was used in textile plants to distribute cool vapor to hot air. He was also the person to coin the term “air conditioning.” In 1925 he invented a more efficient version of his device for a movie theater. Soon his device was in theaters across the country. Ever since, Americans have flocked to the movies to escape the summer heat and thus was born the summer blockbuster season.

How Does Air Conditioning Work?

Modern air conditioning works via the physical principal of phase transition. This law states that when a liquid converts to a gas, it absorbs heat energy. Like when you boil water to create steam.

The liquid in this instance is a refrigerant or chemical compound that evaporates and condenses over and over to cool your home. The refrigerant starts as a liquid that travels through an evaporation coil inside your home. As the liquid evaporates it absorbs heat and, in this case, that heat is from warm air from your home. As the heat is removed, the resulting cool air is distributed back into your home.

The used refrigerant gas is then sent to your air conditioner compressor – that’s the big unit outside – where it is compressed back into a liquid. The hot air that is a byproduct of the process (remember phase transition) is vented outside and the condenser aids the compressor in sending the liquid refrigerant back to the evaporator coil where the cycle begins all over again.

How HVAC Systems Work

HVAC stands for heating, ventilation and air conditioning. Your home’s central air takes advantage of the existing ducts and vents in your home that are also used by your furnace during colder months.

After warm air travels over the evaporation coil and is cooled, fans blow the chilled air through your ducts and vents to reach every room of your home. This network delivers cold air evenly and efficiently throughout your home.

The thermostat connected to your HVAC system regulates all temperatures for both your heating and air conditioning. Each system responds based on the setting you input. Having one central control makes it easy to stay comfortable all year long.  

Why Won’t My Air Conditioner Work?

Like any piece of equipment, air conditioners are subject to break down and failure. Common reasons air conditioners malfunction include:

A repairman examines a air conditioning unit.
No power.Blown fuse or tripped circuit.No signal from the thermostat.Too hot outside to keep up.Dirty or blocked air condenser.Dirty air filter.Broken fan.Problems with refrigerant.Unit not the right size for your home.Older unit (10+ years).Leaky air ducts.

Some of these issues are easier to address than others. If your air conditioner is not working, make sure its receiving power. Check that the circuit isn’t tripped and that your thermostat has fresh batteries. Then make sure your filter is clean and check your compressor for obstructions like brush or grass. If you’re still having problems, it may be time to have a professional technician look at it.

ir Conditioner Repair Service for Los Angeles

Mike Diamond knows air conditioning and HVAC systems. When things heat up, don’t lose your cool. Call or contact Mike Diamond for fast, reliable air conditioner service in Los Angeles and the surrounding area.

The post How Air Conditioning Works appeared first on Mike Diamond Services.

Did you miss our previous article…
https://tkoplumbingco.com/?p=421

post

How to Fix a Toilet That Won’t Flush

>
Person flushing their toilet

Stuck in that awkward plumbing limbo where your toilet won’t flush? Fear not. We’re here to explain the most common reasons your toilet may not be flushing and how you can fix them. If you live in L.A., your local plumbers at Mike Diamond are always ready to help.

Your toilet may be clogged (even if you can’t see it) or it may not be getting enough water.  Any number of working parts could be faulty too. Before the next person in your home needs to go, let’s, ahem, plunge in and help you fix that toilet that won’t flush.

Plunger in a toilet

Your Toilet is Clogged.

An obvious reason why your toilet won’t flush, but a necessary one to consider is that it’s clogged. Never flush anything other than toilet paper and waste down your toilet. Wipes and other items can build up and block your sewer line. Clogs may not be visible if they’re further down the line.

A partial clog somewhere in the line could mean that your toilet will still flush but not very strong. A way to test for a partial clog is to pour a bucket with a gallon of cold water into the bowl. If your toilet still doesn’t flush properly, you probably have a partial clog.

What to do: Use a plunger or toilet auger to loosen things. Make sure you use a flange plunger, since the cup will help you create a better seal in the toilet bowl. Another way to loosen things is to turn off the toilet’s water, flush it, and then add hot (not boiling) water to the bowl. Let the water sit for several minutes, then flush it. If that doesn’t work, either, you should consider snaking the toilet.  If your toilet still won’t flush after trying any of the above methods, you may want to consider professional drain cleaning services.

Check Your Toilet’s Handle and Chain

If the handle doesn’t do anything when you flush, you may have an easy fix. The handle connects to the flapper (the valve that holds the water in the tank) via a small length of chain. A simple explanation may be that the chain got disconnected at either end.

It’s also possible that the chain is the wrong length. When you depress the handle, the chain yanks up the flapper to initiate the toilet’s flush. If the toilet chain is too long, it won’t be able to yank up the flapper. If the flapper doesn’t rise, the toilet doesn’t flush. If the chain’s too short, then then your toilet flapper won’t seal properly and your toilet will run without ever completely filling with water.

What to do: Lift off the lid of your toilet tank. Check that both ends of the chain are connected. If they aren’t clip them back into place. If they are, pull the handle to test that the chain is the right length to lift the flapper fully open and also allow it to close tightly.

Why Won’t the Flapper in the Toilet Close?

As mentioned above, the flapper is the rubber valve at the bottom of your toilet’s tank. A toilet’s flapper opens and closes whenever you flush, allowing water to run from the tank into the bowl. When you depress your toilet’s handle, you’re lifting the flapper. Your toilet’s flapper is in constant contact with moving water that, over time, can bend or otherwise warp the flapper.

What to do: Examine your flapper. Does it seal tightly when it’s closed? Can you see wear or damage? Flappers are inexpensive and available at any local hardware store. Turn off the water at the supply valve, drain your toilet tank and replace the flapper. Make sure you reattach the chain. If you need help, we’re standing by.

djust or Replace Your Overflow Tube

Your toilet’s overflow tube is a part of the tank near the refill tube. Overflow tubes help empty water directly into the toilet bowl during a flush. These tubes are not infallible, unfortunately. The toilet’s constant pressure can easily crack or otherwise damage them. If the tube does crack, water will run into it instead of past it.

What to do: Replace the overflow tube to restore its ability to work. If your overflow tube isn’t working, give us a call and we’ll diagnose the problem and install the proper part.

Your Toilet Tank isn’t Filling Up All the Way

When you flush your toilet, you release water from the tank into the bowl. Releasing a lot of water into the bowl quickly generates the suction required to flush the toilet. When the tank doesn’t contain enough water, it doesn’t create the necessary pressure for a strong flush. You may notice a weaker flush, or no flush at all.

What to do: Open the tank of your toilet to locate the float and the fill line. Flush the toilet with the tank open and watch the water drain into the bowl and fill back up. If the tube stops adding water before the float reaches the fill line, then your toilet won’t be able to perform a full flush. Adjust the float by moving its position on the arm that connects it to the refill tube. Flush again and see if you’ve solved the problem.

weak toilet flush

Clean Your Toilet Jets

The toilet jets are the little holes along the underside of the toilet bowl rim. When you flush, the water from the tank above rushes down through these small openings to create the swirling action you see. If they become clogged with lime or corrosion, it will limit the strength of your flush.

What to do: Get a small nail, length of wire or toothbrush and clean the jets. Use watered down bleach or a solution of vinegar. Place a small mirror on the underside of the rim to see which jets are clogged and dig out any blockage to restore them.

Fix Your Toilet that Won’t Flush

Hopefully, you’ve diagnosed the reason why your toilet won’t flush, and everything is moving again. If it’s still not working and you want Los Angeles’ best plumbers to have a look, call or contact Mike Diamond. We’re the plumbing experts who’ll turn your frustrations into flush elations.  

The post How to Fix a Toilet That Won’t Flush appeared first on Mike Diamond Services.

post

Why Is That Light Bulb Flickering?

A flickering light bulb is the electrical equivalent of a dripping faucet. It may not seem like a big deal but soon enough it will start chipping away at your sanity. Before you throw the lamp and the table it was on out the window, let us diagnose the issue.

Flickering lights don’t have to be your dim future when you keep your home’s electricity working great. Once you figure out what’s causing the flickering, you may be able fix the problem yourself. Here’s a list of possible reasons why different lights may flicker and how to fix the problem.

1.Does Your Light Bulb Have A Loose Connection?

The most obvious and easily fixed reason why your light bulb is flickering is that it’s not properly seated in its socket. If this is the case, it’ll periodically disconnect from its power supply.  When the bulb flickers quickly and repetitively, it’s continually re-connecting and disconnecting from the power in the lamp. If the light flickers when you nudge the lamp, then the bulb is probably loose.

Fixing a loose bulb is hopefully as easy it sounds, and you just need to tighten it. Once it’s fully tightened, the bulb’s receiver should be properly connected with the lamp’s power supply. To tighten your bulb, simply make sure the bulb is cool enough to touch and turn it clockwise in its socket. Don’t try to force the tightening; if it’s not easy to turn, the issue may lie elsewhere.

2. Is Your Light Bulb Faulty?

If the bulb is tight but still flickers constantly, it could be faulty or burned out. Incandescent light bulbs can stop working correctly for all kinds of reasons. Contact problems, faulty wiring connections, worn-out receptacles, or a bad filament can all cause flickering. Often, these problems occur as the light bulb ages. They could also happen as the result of wear-and-tear, improper voltage, or bad wiring inside the fixture.

Older fluorescent lights won’t turn on sometimes and are more prone to flicker if they are dying. You can try rotating a bulb in its fixture to create a better connection, but chances are, it needs to be replaced.

Replacing light bulbs is easy and relatively cheap. As long as you tightened the new bulb correctly, your flickering should stop. If not, read on.

3. Is Your Light Bulb Fixture Causing it to Flicker?

An easy way to check if your light fixture is the problem is to remove the light bulb and try it in a different fixture. If it works, it may indicate that the first fixture is the problem. Over time sockets can wear out and the metal components no longer make a secure connection. The internal wiring could also be faulty.

A worn out fixture will need to be repaired or replaced. If the fixture is connected to your home, you may wish to have a professional electrician make the repair or replacement.

Is the fixture faulty?
4. Is the Light Switch or Circuit Causing Your Lights to Flicker?

If it’s not the bulb or the light fixture, it may be that your home’s wiring is the reason why your light bulbs are flickering. A bad connection in your fixture’s on/off switch may result in irregular flickering. If you wiggle the switch and the light flickers, you’ve likely found the problem and you can replace that switch.

If you experience multiple lights flickering, especially when you have other appliances running, it may be an overloaded circuit. Your home is wired on different circuits – usually room by room – that deliver a finite amount of electrical current. If you have too many items plugged in or are drawing too much power from the circuit, it may affect your lights. You’ve probably seen this when you turn on a high-power appliance like a blender and the kitchen lights dim.

If your home’s wiring is older, it may not be keeping up with increased power demand. A professional electrician can replace your service panel and supply your home with more amperage to meet your needs.

5. Why Is Your LED Light Blinking on and Off?

You’ve upgraded your home to more efficient and longer lasting LED bulbs. Good plan. But are you using a dimmer switch? Not all LED bulbs are dimmable. Only certain kinds that are labeled “dimmable” will work, especially with an older dimmer switch.

You can replace the light bulb with the proper type, but you may need to upgrade your dimmer switch as well. A professional electrician can advise you on the best way to upgrade your lights and switches to make sure they are compatible and function properly.

How Many Times Do You Need to Change Your Light Bulbs?

If flickering bulbs and lights that don’t work properly have left you in the dark, give Mike Diamond a call. We’re your L.A. area experts for all your home plumbing and electrical needs. And even when you can’t see, we’re your “smell good plumber!”

The post Why Is That Light Bulb Flickering? appeared first on Mike Diamond Services.

post

Fuse Box vs Circuit Breaker

A fuse box or circuit breaker is the center of your home’s electrical system. It diverts the electricity from your utility company to all parts of your home. It also provides protection from overload, short circuit or ground fault by turning off the power when wires become too hot.

Most homes use circuit breakers. You can find them in your service panel box which is usually located in the basement. If your home was built before 1960 and your electrical system hasn’t been updated, you may have a fuse box instead. While both systems essentially perform the same function, there are reasons most homes upgrade to circuit breakers.

The Difference Between a Fuse and a Circuit Breaker

Determining whether you have fuses or circuit breakers in your home is easy. Locate your service panel – that’s the metal box containing your electrical circuits – and open it up.

When you open the door, you’ll see rows of either circular plugs or rectangular switches. If you have plugs – which look like the end of a lightbulb – you’ve got fuses. If you see a column of switches, you’ve got circuit breakers.

How Fuses and Circuit Breakers Work

Circuit breakers and fuses both serve the same function: to protect your electrical system from overloading and causing a fire. The difference is how they each achieve this.

Fuses. Those little plugs you see have a filament inside of them that will melt if the circuit gets too hot. When that filament melts, electricity is no longer able to travel to that circuit until you replace the “blown” fuse. You can see the filament through the clear window at the top of the plug and identify if it’s melted or not. A cloudy window is a sign of a blown fuse.

Circuit breakers are electromagnetic on/off switches that control the current to each circuit in your home. When a circuit draws too much power and overloads, the switch receives the surge first and flips off or “trips.” Normally you can unplug whatever overloaded your circuit and simply flip the power back at the tripped circuit breaker.

The Pros and Cons of a Fuse Box vs Circuit Breakers

It’s generally agreed that an old fuse box should be replaced with circuit breakers. While fuses worked well for a time, circuit breakers are more convenient and can handle higher electrical loads more safely. These days, most families run multiple devices that require more amperage. If you are considering fuse box replacement, it’s a great time to beef up your home’s electrical capabilities.

If you have an electric fuse box and a fuse blows, you’ll need to replace it with a new one. That may mean a trip to the hardware store. It also means unplugging everything in the circuit, standing on a rubber mat and making sure you’re replacing the blown fuse with the proper type. Different fuses are rated for different amperage. If you introduce a 20-amp fuse to a 15-amp circuit, it may try to draw more power than it can handle and you risk fire.

My Circuit Breaker Keeps Tripping, Why?

Hopefully, we’ve made a strong case for upgrading from a fuse box house to a circuit breaker house. The benefits certainly outweigh the disadvantages but that’s not to say that circuit breakers have their own quirks. Sometimes a circuit keeps tripping. Here are the possible reasons why:

A worn out breaker. Normally, when a circuit in your home trips, you simply find the offending switch in your service panel, flip it all the way “off” and then all the way “on.” If you have a circuit that keeps tripping regularly, you may need to replace it. Circuits that trip a lot do wear out. Remember, circuit breakers are there to protect you. If it continues to trip, it may indicate another issue.

An Overloaded circuit. The circuit connected to that breaker may have too many outlets or fixtures plugged into it drawing power. A professional electrician can diagnose the problem and rewire or add circuits if needed so that you receive enough electricity without overloading.A Short circuit or ground fault. Other reasons a circuit keeps tripping are a short circuits or a ground faults. These are similar issues where moisture or loose wires create a hazardous electrical connection. A mouse inside the wall may have chewed your neutral wire allowing it to come in direct contact with your hot wire. Or an appliance may have gotten wet allowing the hotwire and the ground to connect via moisture. You can test for these by unplugging everything in the circuit, flipping it back on and reintroducing items one at a time. If you plug an item in and the circuit trips again, you’ve most likely identified the problem.

While it’s possible to diagnose these electrical problems on your own and even replace your circuit breaker yourself, electrical work is dangerous. Having a trusted professional perform the work ensures that it gets done safely and properly.

Get Expert Advice on Fuse Boxes, Circuit Breakers and More

If you live in the Los Angeles metro area and you have outdated fuses, circuits that continually trip or want to know how you can upgrade the electrical in your home, give us a call. You can also contact us online to schedule your service.

The post Fuse Box vs Circuit Breaker appeared first on Mike Diamond Services.

Did you miss our previous article…
https://tkoplumbingco.com/?p=402

post

What You Should Know About Pinhole Leak in Copper Pipe

>
Pinhole leak in copper pipe

Modern copper pipes should last for 20 years or more. Unfortunately, that doesn’t always happen, thanks to a particularly pernicious plumbing problem known as pinhole leaking. Pinhole leaks only occur in copper pipe. Under the right (worst) conditions, copper pipe may develop pinhole leaks within only two years of installation.

Pinhole leak in copper pipe is a common problem all over the US. Your copper pipes spring a pinhole leak when variations in your water’s ph (acid) value wear away at the inside pipe’s natural defenses against corrosion. If you use copper pipes (and, frankly, you should), you should know what a pinhole leak is and how to prevent it. Here’s where to start:

What is a pinhole leak?

The State of Maryland Task Force to Study Pinhole Leaks in Copper Plumbing defines pinhole leaks as, “the perforation of copper tube, pipe or fittings used for domestic water distribution as the result of pitting corrosion initiated on the interior/waterside surface with the subsequent leakage of water.”

Pinhole leaks are generally very small (often less than ⅛” wide) and shaped like pinholes, hence the name. A pinhole leak itself represents the final “burst through” of a worsening corrosion problem on the interior of a copper pipe. In other words, pinhole leaks are not only a problem in and of themselves; they also represent the manifestation of long-term corrosion damage.

How does a pinhole leak in copper pipe occur?

Copper pipe joints made of a different kind of metal

As the Maryland Task Force notes above, pinhole leaks are caused by “pitting corrosion.” The Association for Materials Protection and Performance defines pitting corrosion as “is a localized form of corrosion by which cavities or ‘holes’ are produced in the material.“ Pitting corrosion only affects a very small portion of a copper pipe, eventually wearing away material more and more until it falls in on itself as a “pit” or “hole” – which, in turn, becomes a pinhole leak.

According to the Task Force’s research, pitting corrosion occurs for one of three reasons:

Chemical or mechanical damage to the protective oxide film that coats copper pipe,Localized damage to or poor application of protective coating, orThe presence of non-uniformities in the metal structure of the component, e.g. nonmetallic inclusions.

Any of these three inciting conditions could cause your pinhole leak in copper pipe in the following ways:

Chemical damage

This is the most likely cause of your pinhole leak in copper pipe. Your home water’s ph value has little to no bearing on your water’s quality or safety, but it can affect your pipes. In its own investigation of pinhole leak in copper pipe, the city of Folsom found four different ways water’s ph value could interact with its sulfate content, temperature, bacteria, and/or piping metal to produce the conditions for copper pitting.

Should any of these conditions occur in your pipes, then the chemical reaction will eat away at the protective oxide coating insulating the inner pipes metal from the water running through them. When this coating wears away completely in small places, then that small portion of the pipe is highly vulnerable to corrosion – hence, a pinhole leak forms.

Mechanical damage

Physical contaminants such as sediment or heavy metals present in the water supply may wear away at the inside of your pipes as they pass through. This could occur if your water is particularly hard or only locally treated (if it’s well water, for instance). Abnormally high water pressure may also scrape away the oxide coating of copper piping over time.

Localized damage or poor application of protective coating

It is unlikely but not impossible that your copper pipes are either of a poor quality or were improperly installed. This is more likely if your pipes were retrofitted and/or installed unprofessionally. Damaged copper pipes may not possess the same resistance to corrosion as they should, which can lead to pinhole leaking and other problems.

Non-uniformities in the metal structure

This is particularly likely if your pipes were only partially retrofitted into your home, ie: if your home uses both copper pipes and another type of metal for either piping or connective joints. When two different metals interact, especially in a solvent like water, the resulting tension can wear away at both. In the case of copper pipes, this tension will wear away at the oxide coating inside your pipes, eventually leading to pinhole leaks.

What are the signs there is a pinhole leak in my copper pipe?

Signs of pinhole leak in copper pipe - oxidation of copper pipe

If you suspect you may have a pinhole leak in copper pipe, look for any of the following signs:

Higher water bill: All leaks will raise your water bill, no matter how smallLower water pressure: Pressure leaks out of pinhole leaks just like water does, which will result in lower water pressure throughout your homeDripping sounds: Try to follow the sound to the leak itself, if possibleWater damage: Especially under or around your pipesMold or mildew growth: Especially near your pipesCondensation on your pipes: The outside of your pipes should never feel moist or wetPipe discoloration: If your copper pipes ever look too brown, green, or blue, then it means they’re partially oxidizing

However, keep in mind that pinhole leaks are notoriously difficult to find. After all, they’re very small and they can occur anywhere along a copper pipe. The best way to look for leaks is to turn off your water and check your water meter. If you’re sure you’ve turned off the supply but the water meter is still moving, then you have a leak. If you have copper piping and a leak, then it stands to reason you may have a pinhole leak.

How not to fix pinhole leak in copper pipe

Before we teach you how to fix your pinhole leaks, it’s important you learn what not to do. This is because there’s a lot of bad advice about repairing pinhole leaks out there. Not only are most of the DIY fixes you can read about ineffective, but in many cases they’ll create new problems.

For instance, you shouldn’t use either pipe repair clamps or replacement pipes affixed with couplings. Pipe repair clamps are fundamentally a temporary solution. They may even introduce chemical and metal alterations to your water, which can further wear away at the pipe. Likewise, couplings and replacement pipe negatively interact with the copper in your pipes. This can create the tension that wears away at oxide coating referred to above. By applying either of these methods to your pinhole leak, you might create a big problem by trying to solve a little one!

How to fix pinhole leak in copper pipe

Fixing a pinhole leak in copper pipe

The only truly effective way to fix pinhole leaks in copper pipes is via the “sweating” replacement method. While you can find everything you need to attempt sweat coupling yourself at hardware stores, we generally don’t recommend homeowners try it themselves because it involves soldering and requires significant experience. If you insist on attempting sweat soldering yourself, however, or you’re just curious how it works, this is an overview:

NOTE: sweating pipe replacements are only recommended if you have to repair ½” of copper pipe or less. If the replacement job proves to require more significant replacement, you should call a professional.

Tools required:

Tube cutterCotton ragsMeasuring tapeSweat coupling replacement pipe¾” diameter wire fitting brushSolder wirePropane torch

Steps:

Locate and mark the leak on your pipeTurn off the water main! (this is important!)Drain the pipe of waterCut up to ½” of damaged section and surrounding pipe out using the tube cutterDry the new openings created by cutting away the damaged section. Stuff each side with the cotton rags to keep them from getting wet again. Only remove these cotton rags right before you solderMeasure the gap created by removing the damaged sectionMeasure and cut a replacement section of sweat coupling replacement pipe that’s 1” longer than the gap’s measurementSmooth the rough edges of the replacement pipe with the cutterSmooth the rough inner edges of the pipe with the wire fitting brushClean and smooth the cut sections of attached pipe, as you did with the replacement sectionSlide the sweat coupling replacement pipe over each end of the remaining pipes. Make sure about ½” of the replacement pipe fits over the old sectionSolder the new joint by holding the torch to one side and the tip of the solder wire to the other until enough of the wire melts into the opening to completely fill itTurn on the water and test the repair

How to prevent pinhole leaks in copper pipes

With a little investment and diligence, you can prevent the problems that create a pinhole leak in copper pipe listed above. Here’s how to make sure each one doesn’t give you grief:

Chemical damage

The chemical interactions that wear away at copper pipes typically occur because of high ph value in your water. Investing in a water softener can help prevent the kind of ph values that will harm your copper pipes. If you already have a water softener, make sure it’s functioning correctly and adjust it as needed.

Mechanical damage

A water softener will also remove many of the contaminants that could scrape up your copper pipes over time.

Water softeners won’t affect your water pressure, however. If your water pressure seems abnormally high, you may have to take other measures. Check the pressure meter on your water main. If it seems much too high, then you should ask your municipal water supplier why. If they can’t determine a cause, invest in a water pressure limiter to keep high pressure from hurting your pipes.

Localized damage or poor application of protective coating

If your pipes were improperly installed or look damaged, then we highly recommend replacing them as soon as possible. A professional plumbing inspection can tell you if you need to replace your pipes or if less major fixes are possible.

Non-uniformities in the metal structure

It may be possible to replace outdated joints, fittings, or old segments of pipe used throughout your home. We recommend a professional plumbing inspection to determine where the problematic pipe material is and what we should do about it.


Pinhole leak in copper pipe is a frustratingly common and significant problem for homeowners throughout the US. Fortunately, it’s also an easily fixed problem. If you think you may have a pinhole leak in your copper pipes, all you have to do is call Mike Diamond.

The Smell Good experts can find your pinhole leaks, fix them, and help you make sure they don’t happen again. Your copper pipes are far too effective (not to mention expensive!) for you to tolerate leaks, no matter how small. So stop tolerating and call now!

The post What You Should Know About Pinhole Leak in Copper Pipe appeared first on Mike Diamond Services.

post

What to Do When Someone Puts Dish Soap in Your Dishwasher

>

There’s only one main difference between dish soap and dishwashing detergent, but it’s a big one. Dishwashing detergent does not create suds, but dish soap does. The idea of a dishwasher overflowing with bubbles might paint a funny picture but it’s also big, messy problem. If you accidentally put dish soap in dishwasher once, it’s a headache. If it happens more than once, the soap scum build up could eventually damage your dishwasher.

If the worst happens and you find yourself facing an endless soap avalanche, don’t fret. We’ll tell you how to clean out a dishwasher with dish soap in it. More importantly we’ll tell you how to restore your dishwasher to prevent future problems. If your dishwasher doesn’t work properly after these steps, call the pros at Mike Diamond to help.

How to Fix Dishwasher with Dish Soap in It

First things first, stop the dishwasher immediately. Cancel the wash cycle. If you’re lucky, the suds haven’t quite overflowed just yet. The sooner you turn off the dishwasher, the better your chance of keeping the suds out of the machine’s inner workings.

Once you’ve canceled the cycle, your dishwasher should start draining. It won’t clear everything out, but it’ll make the clean-up process a little less damp.

Clean up any overflow.

If you couldn’t stop the cycle in time, you’ll have some cleaning up to do. Don’t let water sit and seep into cabinetry or floorboards. Use a wet mop to clean up the overflow. Since the mixture is water and soap, wiping it up with dry towels can leave residue behind.

Silver lining: your floor is now clean.

Take out the dishes.

Before you clear out the pipes and drain, you’re going to have more sopping up to do. Open the dishwasher after it finishes its initial draining. Remove the dishes and move them into the sink.

Rinse off the dishes in the sink to remove any scummy residue that might have clung to them during the overflow. Consider washing the dishes by hand just this once, while your dishwasher is… recovering. Otherwise, just rinse them off and leave them in the sink. After you’re done cleaning, you can simply put the dirty dishes back in the washer for another cycle!

How to get suds out of the dishwasher.

This is the labor-intensive part. You’re going to have to rinse out and dry the inside of your dishwasher. If you don’t clean it fully, you’ll continue to have problems with suds and soap scum.

Use a small bowl or pan and repeatedly fill it with clean water to rinse away bubbles. If your dishwasher is close enough to your sink, you could use your sprayer to rinse it out.

Keep rinsing until bubbles don’t appear when you pour the water into the inside and bottom of the appliance. After you’ve rinsed enough, use towels to wipe down and dry out any remaining water. You may have to remove the drawers to complete this step.

Turn on the rinse cycle and let it run.

You don’t have to do a full cycle. Run the rinse cycle for three to five minutes. It should be enough to remove any remaining suds. If you’ve done everything else listed here, you should be free of dish soap in your dishwasher. If there are suds, the rinse cycle will wash out any remaining residue. Once that’s done, your dishwasher should be back in working condition.

Don’t Put Dishwashing Soap in Dishwasher!

Now you know what happens if you put dish soap in the dishwasher. Hopefully you’ve successfully flushed your dishwasher after the soap suds fiasco and lived to tell the tale. The next time this or any other plumbing emergency happens give us a call. The team at Mike Diamond is happy to service your dishwasher to ensure you have clean dishes for a long time.

The post What to Do When Someone Puts Dish Soap in Your Dishwasher appeared first on Mike Diamond Services.

Did you miss our previous article…
https://tkoplumbingco.com/?p=392

post

Why Am I Running Out of Hot Water?

>
Woman running out of hot water before the end of her shower

There are all kinds of reasons why your water heater isn’t producing enough hot water. It could be too small, the settings may be wrong, or there could be a more serious problem. Sediment buildup, broken dip tubes or heating elements, and leaks can all steal your hot water away.

By determining exactly how you’re running out of hot water, you can home in on the problem. Find the description that most closely matches your hot water issue below to find out what’s going on. Once you know why you’re running out of hot water so quickly, you can try to solve it yourself or you can call in the Smell Good Cavalry:

Your water comes out in spurts of hot and cold

If your hot water seems to run hot and cold randomly regardless of what you tell it to do, then there may be sediment build-up in your water heater’s tank. Sediment builds up faster when you have hard water, when your pipes are old, or if your anode rod is worn out. Sediment build-up leaves less space for hot water in the tank. It can absorb too much of the heat generated by the heating element.

First, try flushing and draining the tank. We recommend either doing it yourself or having the pros perform a full drain and flush around once per year. If you keep running out of hot water even after a flush, then it’s possible that too much sediment has built up. Unfortunately, the only way to solve that problem is to replace your tank. In fact, you should replace it quickly… or it could, uh, explode.

You keep running out of hot water after a very short period of time

Man running out of hot water during a shower

Most water heaters have two heating elements: one at the top, and one at the bottom. The top heating element repeatedly re-heats the water near the top of the tank. The bottom heating element heats all the water added to the tank to store it at a constant hot temperature. At least, that’s what it should be doing.

If your bottom heating element stops working, then it isn’t heating most of the water in your tank properly. Instead, you’ll be forced to rely on the small quantity of water your top element heats. When that water runs out, your water heater will send you unheated water instead… which makes for the nasty shower surprise you’re all too familiar with. To fix this problem, replace your tank’s bottom water heater element. Give us a call and we’ll take care of it fast.

Your water never gets above a lukewarm temperature

The water heater’s dip tube pushes the cold water to the bottom of the tank. There, the lower element heats it before you use it. If your water heater’s dip tube breaks, then all the replacement cold water added to the tank mixes with the hot water already inside. As a result, you get a lukewarm mixture of hot and cold water that satisfies nobody, like a reverse Goldilocks.

If your dip tube is broken, you may discover small chunks of plastic in your showerhead or sink strainers. Take off your showerhead and look for debris. If you find any, then you could try to test and replace your dip tube yourself, or call in the pros. Replacing a dip tube is relatively cheap, quick, and easy.

You’re running out of hot water before everyone is finished with it

water heater sizes. If your water heater is constantly running out of hot water, it may be too small for your home

Does this sound familiar? You’re locked in a constant competition against everyone in your home to seize the bathroom first thing in the morning. If you’re unlucky enough not to be the early bird, then you’d better shower quickly or risk a rude (and cold) awakening. And forget about showering while someone’s washing dishes, running the dishwasher, or doing the laundry – that’s a one way ticket to your own private Antarctica.

Your water heater is probably simply too small. Conventional water heaters can supply an amount of water equal to the size of their storage tank. If you use more water than the tank can provide, then your heater spends 20 to 30 minutes reheating new water. If your water heater is too small for your needs, you’ll have to replace it with a bigger one.

You’re not getting any hot water at all

Did you know that your water heater has a thermostat that dictates how hot your water gets? It works just like any other thermostat: you tell it how hot you want your water, and your elements heat to that temperature. If you’re not getting any hot water at all, then your thermostat may be malfunctioning… or simply set improperly!

Most water heaters have a reset button. Troubleshooting your thermostat is as easy as clicking that button. In case that doesn’t work, locate the thermostat itself and make sure it’s set correctly. If you still have the owner’s manual, the manufacturer should have included the settings inside. If you’re like 99% of people and you have no idea where that manual is, find the settings online. Reset to the heat you want, then try resetting again. If that still doesn’t do the trick, give us a call.


If you don’t see your particular issue listed here, don’t worry. These scenarios cover the common problems, but they’re by no means exhaustive. If you still don’t know what to do after either failing to find your problem or trying our proposed solution to no avail, you still have your trump card: us.

Whatever the strange, unique, unlikely reason you’re running out of hot water, Mike Diamond’s experts will find it and will provide a solution. We’ve yet to be stumped by even the most outlandish of hot water hang ups – and we’ve seen some doozies. Next time your shower takes an unpleasant turn for the freezing, just give us a call right away. Or at least… as soon as you get out and warm up.

The post Why Am I Running Out of Hot Water? appeared first on Mike Diamond Services.

Did you miss our previous article…
https://tkoplumbingco.com/?p=381

post

Is My Garbage Disposal Leaking?

>
Garbage disposal leaking from reset button

Garbage disposals usually leak from three places: the top, the pipe connections, and the bottom. To find out if your disposal is leaking, check each common place where leaks start. Use a flashlight to check for condensation, puddling, and other signs of water accumulation on or beneath your disposal.

Each common garbage disposal leak happens for a different reason. Usually, a minor component is simply too loose or it’s worn out. By finding where your garbage disposal is leaking, you’ll be able figure out why it’s leaking and how you can fix it. Here’s everything you need to know to fix your garbage disposal’s leak quickly and accurately.

Where is my garbage disposal leaking from?

Garbage disposals commonly leak from four different places:

The sink flange at the top of the garbage disposal. This connects the disposal to the top of the sink.The dishwasher hose connection on the side of the disposal. This is where the flexible plastic dishwasher hose connects to the disposal.The drain line connection, also located on the side of the disposal. This is where the main drain pipe connects to the disposal via curving metal or PVC plastic pipes.The reset button on the bottom of the disposal. This button deactivates the disposal if it jams or the motor overloads.

How can I tell if my garbage disposal is leaking?

Garbage disposal leaking from either the side or bottom

First, look for the obvious signs. Check under your kitchen sink for puddling water, dampness, dripping, or a musty smell. If you see any signs of leaking, check to make sure it isn’t the sink itself or the sink’s p-trap. Then, grab a flashlight and bucket to look for each common garbage disposal leak.

Turn off the garbage disposal and unplug it completely. Then, fill up the sink with water about halfway. If you have food coloring, add it to the water to make the leak easier to spot. You can locate the leak in the following ways:

The sink flange: Check for dripping or water accumulation around the top and bottom of the ring of the flange. Use the flashlight to look for water coloring and feel for wetness by hand.The dishwasher hose connection: To properly look for this leak, you’ll have to run your dishwasher. Start the dishwasher without turning back on the disposal. Watch the hose as water runs from the dishwasher drain through it into the disposal. Pay particular attention to the connections between the hose and disposal.The drain line connection: Check the connection between the drain line and disposal. Pay particular attention to the screws that fasten the line to the disposal and to the gap between the disposal and drain line.The reset button: The reset button is in the center of the bottom of the disposal unit. Shine the flashlight under the disposal to look for it. Check for a slow, constant dripping or water accumulation beneath the unit.

Why is my garbage disposal leaking?

Each of the four common leaks outlined so far have different causes and fixes. Here’s where your leak is coming from and what caused it:

The sink flange: The sink flange is held in place by plumber’s putty and bolts. If the putty deteriorates or the bolts rust or loosen, the watertight seal between the flange and sink may break, leading to your leak.The dishwasher hose connection: If the dishwasher hose is leaking, it’s usually because the screws holding it to the disposal have loosened. This can happen because of rust or simply as a result of time and jostling. It’s also possible the drain hose or clamp are leaking.The drain line connection: If the drain line is leaking, then either the screws securing to the disposal have worn out, or the rubber gasket inside the mounting assembly itself is leaking. Remove the screws, take down the drain line, and check the gasket inside for signs of wear and tear.The reset button: If your garbage disposal is leaking from either the reset button or any other part of the bottom of the disposal, then it probably means a seal inside the unit itself has worn out. This can happen when a garbage disposal gets old.

How to Fix a Leaking Garbage Disposal

Repairing a garbage disposal

Now that you’ve identified the where and why, you’re prepared to fix the actual problem. Luckily, fixing a leaking garbage disposal is usually pretty straightforward–even if the fix isn’t always what you’d like to hear:

The sink flange: Unscrew the bolts and check for rust or other deterioration, and replace them if you find any. Then, remove the flange, scrap off the putty holding it in place, and reapply fresh putty. Turn back on the water to test the seal.The dishwasher hose connection: First, try using a screwdriver to tighten the screws on the metal clamp connecting the hose to the disposal. If the screws don’t seem to tighten properly, consider replacing them. It’s also possible the hose itself is leaking, in which case you’ll have to replace it.The drain line connection: You may be able to fix this leak by tightening the connection between the pipe and disposal. Try un-attaching and reattaching the pipe if tightening doesn’t work. If you’re still having issues, try replacing the screws or gasket. You could also use a pipe clamp and tighten with a screwdriver.The reset button: Unfortunately, if your garbage disposal leaks from the bottom, then it’s probably simply time to remove the garbage disposal and replace it. If one internal seal is worn out, after all, then the rest are probably getting there too.


By following the directions above, you should be able to identify and fix just about any garbage disposal leak you’re dealing with. Of course, “should be able to” doesn’t necessarily mean will be able to. Sometimes unusual leaks happen. These leaks can be tough to figure out, much less fix!

Whether you have a weird leak you can’t get a handle on, or you just need to ask some questions, feel free to call Mike Diamond any time. We’ve got everything we need to handle any garbage disposal problem you can throw at us.

The post Is My Garbage Disposal Leaking? appeared first on Mike Diamond Services.

Did you miss our previous article…
https://tkoplumbingco.com/?p=376

post

How to Clean Mold in Showers

>
A white tiled shower with dark mold stains.

There are thousands of types of mold. Mold spores travel through the air around us every day. Once these spores settle, they can reproduce in 24-48 hours. All they need is a moisture and oxygen. Bathrooms and showers provide the perfect breeding ground for mold to grow.

Unlike mildew, which forms on surfaces, mold is a fungus that can penetrate porous materials. If you see black or green gunk in the corners of your tiles and caulking or dark spots along walls, you probably have mold.

Molds carry health risks, especially for people with acute illnesses and compromised immunity. We’ll show you how to clean mold in showers to avoid these health risks. We’ll also give to tips for preventing mold in your bathroom and your home.

What Kind of Mold is in Your Bathroom?

Diagram of different types of mold.

Molds come in three different classifications:

Allergenic:  Causes an allergic reaction or asthma-like symptoms.Pathogenic: Harmful to people with acute illness or compromised immunity.Toxigenic: Dangerous or even deadly to everyone.

Unfortunately, it can be difficult to tell different kinds of mold apart. Black mold in showers could be Stachybotrys – the most toxic “black mold” – but it could be Alternaria or Aspergillus, two common household molds.

You can have your mold tested to determine what variety it is, but the CDC recommends treating all molds as harmful. It’s best to remove and clean any mold as quickly as possible.

8 Steps to a Mold-Free Shower

To fully get rid of black mold in your shower, orange mold in your shower and mold in shower grout, use a cleanser specifically designed for mold. While bleach is often touted as the best way to get rid of mold, it doesn’t fully address the problem. Bleach is good at removing mold stains and surface mold, but it doesn’t kill fungus that has soaked in.

If you prefer not to use a commercial detergent, you can create a 1:1 solution of hydrogen peroxide and water or white vinegar and water to kill deep-rooted mold.

A woman scrubs mold from shower grout with a toothbrush.

You will need:

CleanerSpray bottleRubber glovesCleaning clothScrub brush with stiff bristlesToilet paper or paper towelBleachVinegar

To perform a thorough cleaning, follow these steps:

Spray down all affected areas of shower with detergent or cleaning solution.Let soak for 20 minutes-hour.Apply rolled paper towel or TP in cracks and along tub rim to keep cleanser soaking against mold.Scrub vigorously with brush.Rinse and wipe with clean water.Scrub any stained areas with bleach.Rinse and wipe.Spray with white vinegar and let dry.

The final step is a preventative. White vinegar inhibits mold from growing and will reduce the chance of mold returning to your shower.

If you have significant mold growth or are worried that you have toxic mold, consult a professional remediator. Don’t take on large mold projects yourself.

Never paint or caulk over moldy walls/ cracks. You won’t stop the mold from reproducing or being a health risk. Replace old moldy caulk with new, mold-resistant caulking.

 Remove Mold from Shower Head

A moldy shower head.

Shower heads inevitably build up with mineral deposits and sometimes mold. If you’re wondering how to clean all those small nozzle holes, here’s a trick.

Put a 1:1 solution of white vinegar and water in a plastic bag. Place the bag over your shower head and seal it shut with rubber bands. Let your shower soak in the solution overnight. The next morning your shower head will be like-new and, best of all, mold free.

How to Prevent mold in Showers and Bathrooms

The best way to get rid of mold is to prevent it from being able to form. Follow these practices to limit mold from growing in your shower.

Turn on an exhaust fan or open a window when showering.Keep humidifiers at 50% or less.Clean your bathroom often with mold-killing products.Fix leaks, drips and other sources of moisture.Change air filters frequently.Don’t leave wet towels or laundry on floor.Spray vinegar on shower walls regularly to prevent mold growth.

By keeping a dry, clean home, you significantly limit mold’s ability to grow. Regular bathroom cleaning and maintenance means no ugly dark stains on tile or grout.

Plumbing Issues Related to Bathroom Mold

If you have mold in your bathroom from leaky pipes, bad drains or drippy faucets, Mike Diamond can help. If you’re in Los Angeles or the surrounding area, schedule service with a certified plumber to evaluate and repair your plumbing issue today.

The post How to Clean Mold in Showers appeared first on Mike Diamond Services.

Did you miss our previous article…
https://tkoplumbingco.com/?p=370